Pages

Sunday, June 19, 2011

Roses are Red...


Back when I was taking my fondant class and had to make 40 fondant roses for one practice cake, I swore I would never make another rose. Not that they are difficult by any stretch of the imagination...just labor intensive. And they have to be done over a couple of days. No banging these puppies out in a few minutes!

When my mom saw pictures of that cake with the 40 roses she gasped and declared that was the most beautiful cake that I had ever done (I couldn't agree since it was very much a practice cake, but I do agree that the roses are pretty). She has bugged me ever since to make her a cake with roses.

So this weekend was her birthday and I made her a cake with roses. My mom's favorite flavor of cake is lemon, so this was a 6 inch lemon cake with vanilla Swiss Meringue buttercream filling. I really love how simple and pretty this cake turned out. My mom loved it too! She was so surprised when she opened the cake box! It was a lot of fun to make her something that I knew she would really love.

Wednesday, June 8, 2011

A Smashing Good Time!


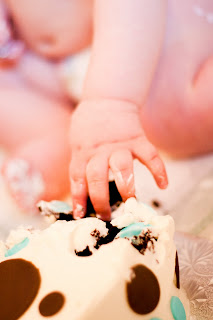
It's a little late in coming since L turned one at the end of February, but these pictures were well worth waiting for! I love that we did this smash cake photo shoot with our little man! A million "thanks" to our dear friend, Cory Loewen, who is passionate about taking photos and was kind enough to come and take these amazing pictures of our baby demolishing a cute little cake!

Sunday, June 5, 2011

Pink and Pearly


A dear friend of mine asked if I could make a cake for a bridal shower she was organizing for her sister-in-law to-be. She showed me a napkin with the picture of the cake she wanted and I figured this would be the easiest cake design ever! Unfortunately that was not the correct assumption. This is one of those times were I was humbled by a cake. The colors were easy enough to match, but the issue came in when I was doing the pearl swags along the sides. I kept wondering why it was looking so strange...

First off I realized that the pearl sprinkles that I was using were all sorts of different sizes, and the larger pearls were making the swags look really messy. I remedied that by picking off all the larger pearls and replacing them with smaller ones. It was a time-consuming job, but well worth the effort. It was looking better, but still unfinished in some sort of way.

My DH and I kept looking at the picture of the cake and then at the cake not understanding what the issue was. Then it hit us...in the picture you couldn't see where the pearls start on each tier, since it's a two dimensional image. This means there was no reference on the cake for where the pearls were attached. So after a bit of head-scratching (and a whole lot fear that this was just going to be a less-than-beautiful cake) I thought little flowers would be cute and give the pearls some reference. The great thing was that there were these exact cute little flowers floating around the cake on the napkin. The flowers on the napkin were pink and blue, but I thought that those colors would make the cake too much like a little girl's cake. Since this was for a bridal shower, the slightly more sophisticated brown won out. Thankfully, my friend was just as excited about this change as I was and loved the cake.


So I learned a valuable lesson through this experience. That a two dimensional image does not always translate well into a three dimensional cake. Who would have thought?! Next time I think to myself "wow, that will be super-easy!" I am going to think twice, deconstruct each part of the cake into steps, and visualize how it's going to look. I do that with any complex cake I am considering, so I need to do it with the so-called "easy" cakes as well. Good lesson!

Sunday, May 15, 2011

Airplane Cake!


,
So I took a little trip down memory lane today and read some old blog posts. I honestly can hardly believe the cake I did this weekend in light of how intimidated I felt only one year ago about carving and constructing a cake like this. Yes, it's been one year since I took that wonderful fondant cake decorating course. I never in a million years imagined myself doing cakes such as this one at that time.

I am proud of this cake, and for more reasons than just the carving and decorating. You see, I still tend to approach cakes somewhat timidly and wonder each time if "this will be the one that really flops". I was thankful it wasn't this one for two reasons. First because I really wanted to pull it off, but second, and most important...this cake was for one of my son's very good friends, who is also our neighbor. We have the best neighbors in the world, and I loved doing this for them!


So onto the cake! I began conceptualizing this cake a few weeks before the party...looking online for sample cakes from which to take inspiration as well as trying to deconstruct the entire cake into steps in order that my cake making days might go smoothly. This is one of the most important steps for me. I can have no confidence going into a decorating day if I don't have a very clear idea of each thing I need to accomplish. So I made templates, and talked it over with my husband, who always has really good ideas and is quite the perfectionist (he pushes me to do better and go farther, which, although at times frustrating, is exactly what I need). My neighbors had also left all the creative work to me, so I had full reigns on this one! (scary!)

The first day of decorating came and I carved out a rough airplane shape with my template and stacked my cakes. Then all I had before me was just a monstrous block of cake. Oh my... I wondered once again what I had gotten myself into and how this very "un-airplane" looking thing was going to turn into a fabulous airplane cake! So it was with a pounding heart that I dove into that cake and started shaving away. Somewhere in there I got into a groove and my excitement mounted. This thing was actually starting to look like an airplane! YAY! I kept carving and about an hour and a half later, the shape was done and looked quite fabulous to me! I covered the cake in fondant, decorated the cake board, and called it a night.

The next day I made the wings and tail out of foam core (I tried making the wings out of gumpaste, but they were too thin and light for the size of airplane, so I went with foam core because it's thicker, but very light and wouldn't pull down on the cake) and covered them in fondant. I decorated the airplane, and started wondering how big those engines were going to have to be in order for them to hold up the wings. I went back and forth between a few different ideas, but in the end I decided to cover foil wrapped chocolates in gumpaste (cuts down on the amount of gumpaste needed, and since gumpaste is not terribly palatable, gives a fun treat inside the engines for the kids). After painting on some pearl dust I was ready to call it done. It had been a very long day of decorating and there comes a point where it just needs to be finished! But my husband had other ideas. He wasn't convinced the engines were quite right, yet, so he decided to give them a little more realistic look with a black insert and knob in the centre. I was so happy he helped me with this detail. They look amazing and really do add to the cake as a whole.

After all this it was time to assemble the cake! The wings went on and we were excited (my husband helps me with all these little picky details...he's just the best!) and then after the tail went on I stood back, and honestly couldn't believe I had made that cake. It looked just like an airplane!


Before starting the cake I had no idea how big the airplane would end up being. I was afraid it wouldn't be enough cake for everyone at the party, so since I was completing a cupcake order for Barely Burnt Cookies and More (a fun little cupcake and cookie "non-business" that my sister and I started not too long ago...check out our blog here) I offered to include chocolate cupcakes (the airplane was vanilla cake with white chocolate peppermint filling) just so there would be enough cake...and it also added an extra flavor for people to choose from. I had found a fun airplane cookie cutter and it made for a perfect fondant cupcake topper.


So this was a fun one. It was a lot of work, but it was worth it!

Monday, April 18, 2011

Dots and Daisies


Spring has sprung! Well...not really. Perhaps just in my cake world it has. The forecast for flurries today would suggest our Manitoba "Spring" is more than just a little chilly.

It was once again Spring in my kitchen this weekend, though! This was such a fun cake to decorate! From the moment that this wonderful customer sent me a picture of an inspiration cake for her daughter's graduation celebration, I was excited. I had never made daisies like this before, and have always wanted to try, since I think they look so adorable. I love how they look on the cake. I love the bright colors, the dots...I love pretty much everything about this cake, right down to the flavor combination they choose. The bottom tier was lemon cake with lime buttercream filling, the middle was chocolate cake with white chocolate peppermint filling and the top tier was vanilla with lemon buttercream filling. Really tasty combinations, and I have fallen in love with lime swiss meringue buttercream. Wow, is that ever yummy!


The only downside on this cake is that I wasn't on time. I am thankful for my customer who was so gracious to wait for me to finish each detail on the cake. Making cakes with two little ones around can be difficult, and this week and weekend it seemed downright impossible.

In the end, my customer was really happy, and I've been told that her daughter loved it as well!

That same day we had a "smash cake" photo shoot with our littlest guy. It's a little late (his birthday was in February) but it was so much fun and I'm glad we did it. So it was the weekend of cake. Stay tuned in the next few weeks for some action shots of a little cake being destroyed by a little guy. I'm exited to see the pictures, myself!

Tuesday, March 22, 2011

Stop in the name of...cake?


I had the pleasure of making this Police Car cake for a good friend's little boy who just turned 4 years old! When my friend asked me to make this cake, I figured that it would be really difficult to carve a good car shape. So instead of carving the car, I cheated and used a three dimensional car pan. I was a little sad that I didn't attempt the carving, but in the end I liked how it turned out and it made the process so much less stressful. Although I did carve out the wheels so I could add more realistic-looking fondant wheels.

It was a lot of fun to think of the details on this cake. I was especially excited to make little piles of chocolate rocks (don't they look so real?!) and have fondant grass poking out of it. To me it's the details the make a cake an entire experience...not just a regular cake. Two details, however, I cannot take credit for, and that are the license plates. My husband volunteered to meticulously cut out "Elijah" for the front plate and "Is 4!" for the back plate. He did an amazing job! Hard to believe this was his first time working with fondant!


I also made 24 mini cupcakes for the party. Going along the Police theme, I hand cut 12 Police badges with the number "4" in the center as toppers. The other 12 cupcakes had a star topper. They were so adorable!


I now have a few weeks of a break until the next cake! As usual, I'm excited to start planning!

Sunday, March 13, 2011

Blossoms and Branches


Considering that it still feels like the middle of Winter out here, it was really nice to make a cake that represented the hope of Spring. Well, it was actually a birthday cake...but it represented "Spring" to me as I was making it! (There was even a blizzard the night this cake was picked up. Seriously...Winter needs to be over!)

I really enjoyed making this cake. From a design standpoint it wasn't too difficult. The only thing that took a lot of time were the fondant blossoms since each had to be done by hand. I didn't count how many blossoms made it on the cake but I'm sure I made upwards of 50 fondant blossoms. After letting the blossoms dry for a day or two I brushed them with white pearl dust to give them a bit of dimension. Otherwise they kind of looked like fabric...neat, but not what I was going for. The only unfortunate thing about these blossoms is that they are so very delicate. I dropped more than my share in the process of making this cake, and they just shattered as they hit the floor. I really hope the cake made it to the party with all blossoms in tact!

In the end I was a little sad to see this cake walk out the door. I really liked how pretty it looked sitting in my kitchen. Glad that so many others got to enjoy it, though! And now to start thinking about next week's cake...